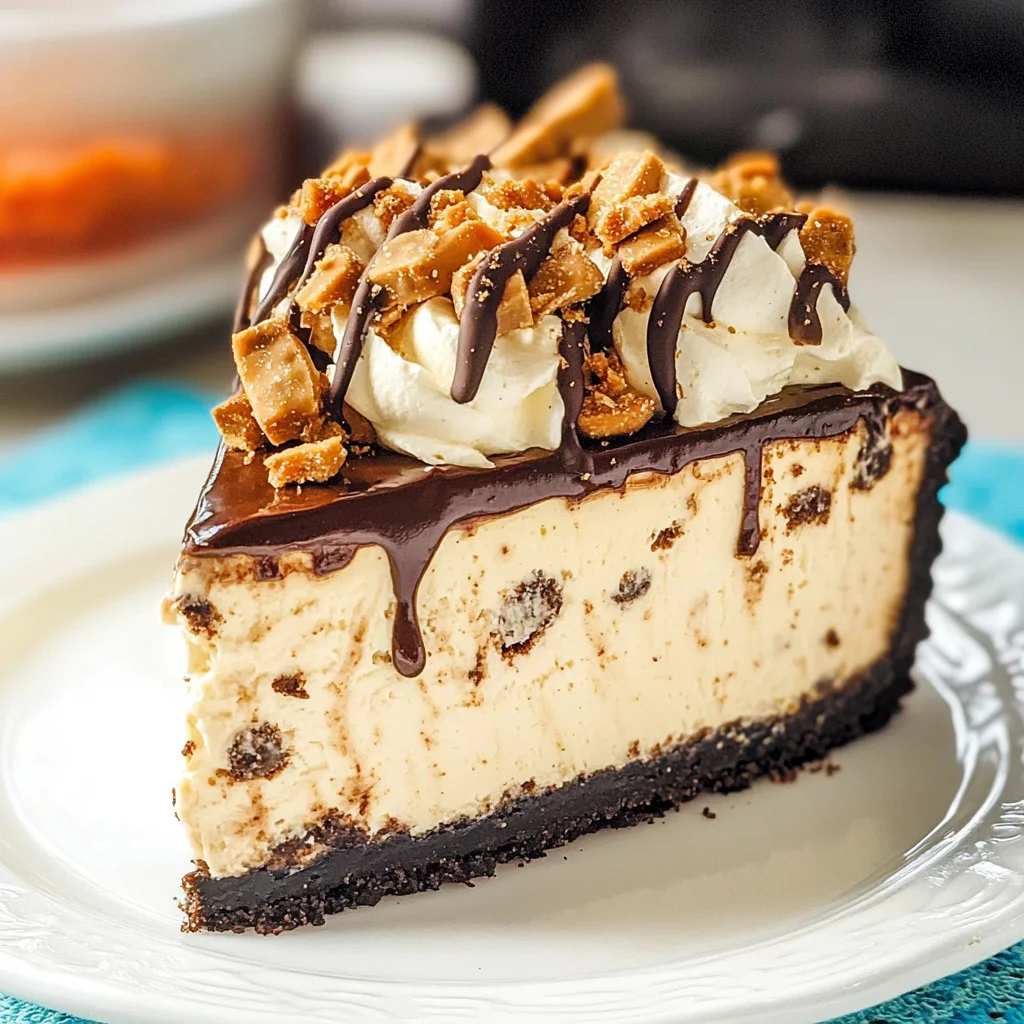
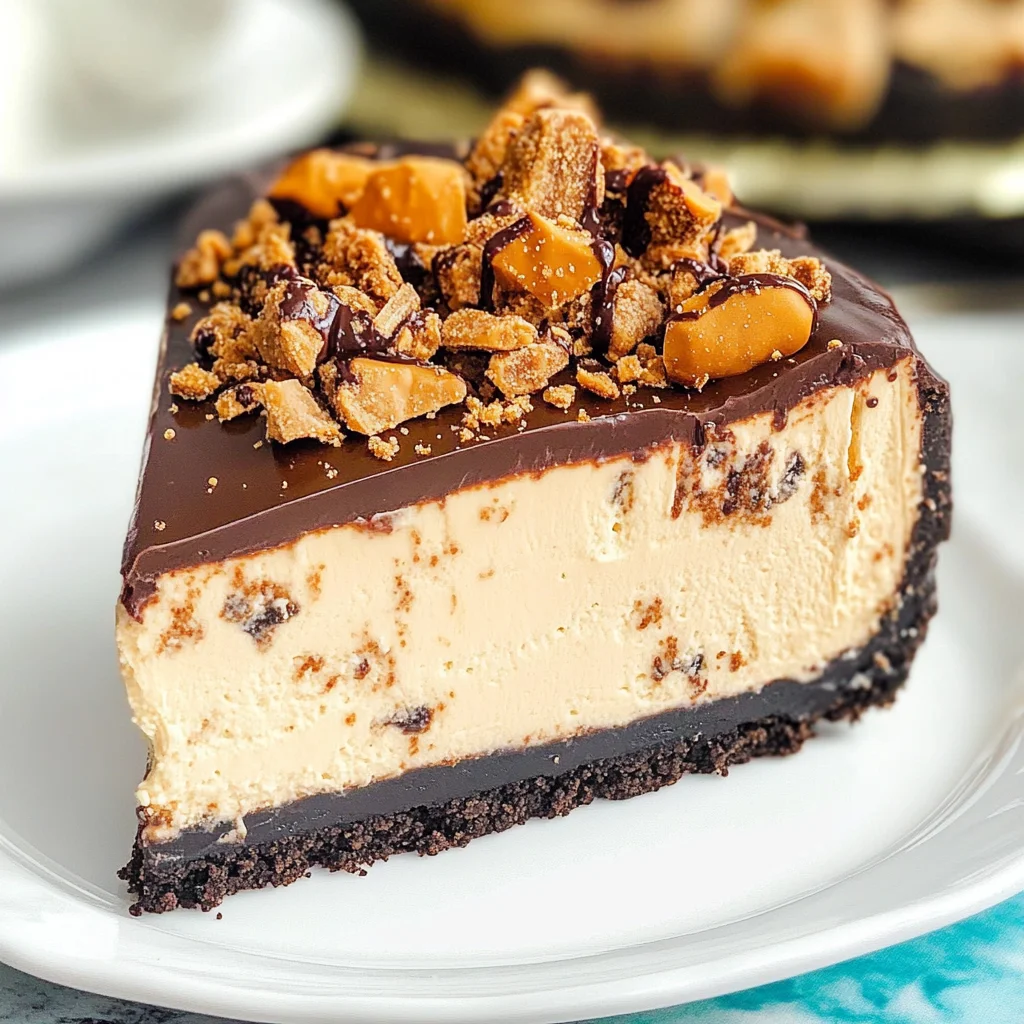
Butterfinger Cheesecake
This Butterfinger Cheesecake is a delightful dessert that combines rich, creamy peanut butter cheesecake with the irresistible crunch of Butterfingers, all nestled in a chocolate Oreo crust. Perfect for any celebration or just a sweet treat at home, this cheesecake is sure to impress family and friends with its decadent layers of flavor and texture.
Why You’ll Love This Recipe
- Irresistible Flavor: The combination of peanut butter and Butterfingers creates a flavor explosion that will satisfy your sweet tooth.
- Decadent Texture: With its creamy filling and crunchy crust, this cheesecake offers a delightful contrast in every bite.
- Easy to Make: Follow simple steps to create an impressive dessert without complicated techniques.
- Versatile Occasion: Whether it’s a birthday party or a holiday gathering, this cheesecake fits right in at any event.
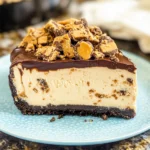
- Visual Appeal: The layers of chocolate ganache and whipped cream topped with chopped Butterfingers make for a stunning presentation.
Tools and Preparation
To create this delicious Butterfinger Cheesecake, you’ll need some essential kitchen tools. Having the right equipment makes the process smoother and more enjoyable.
Essential Tools and Equipment
- Springform pan
- Mixing bowls
- Electric mixer
- Rubber spatula
- Measuring cups and spoons
Importance of Each Tool
- Springform pan: This allows for easy removal of the cheesecake, ensuring it maintains its shape when serving.
- Electric mixer: A must-have for achieving a smooth and creamy filling without lumps.
- Rubber spatula: Helps scrape down the sides of the mixing bowl for thorough ingredient incorporation.
Ingredients
This Butterfinger Cheesecake is a rich, thick and creamy peanut butter cheesecake filled with chopped Butterfingers in a chocolate Oreo crust. It’s topped with decadent layers of chocolate ganache, peanut butter whipped cream and more chopped Butterfingers!
For the Crust
- 2 1/4 cups (302g) Oreo crumbs
- 4 tbsp (56g) salted butter, melted
For the Cheesecake Filling
- 24 ounces (678g) cream cheese, room temperature
- 1 cup (207g) sugar
- 3 tbsp (24g) all purpose flour
- 3/4 cup (173g) sour cream, room temperature
- 1/2 cup (140g) peanut butter
- 1 tsp vanilla extract
- 4 large eggs, room temperature
- 1 1/2 cups (12 fun sized bars) chopped Butterfingers
For the Toppings
- 6 oz semi-sweet chocolate chips
- 1/2 cup heavy whipping cream
- 3/4 cup heavy whipping cream
- 1/2 cup (58g) powdered sugar
- 2 tbsp (35g) peanut butter
- 1/4 tsp vanilla extract
- Chopped Butterfingers
How to Make Butterfinger Cheesecake
Step 1: Prepare the Crust
- Preheat your oven to 350°F (175°C).
- In a mixing bowl, combine Oreo crumbs with melted butter until well mixed.
- Press the mixture firmly into the bottom of a springform pan to form an even layer.
Step 2: Make the Cheesecake Filling
- In another bowl, beat cream cheese until smooth.
- Gradually add sugar and flour while mixing until combined.
- Mix in sour cream, peanut butter, and vanilla extract until smooth.
- Add eggs one at a time, mixing just until incorporated after each addition.
- Fold in chopped Butterfingers gently.
Step 3: Bake the Cheesecake
- Pour the filling over the prepared crust in your springform pan.
- Bake for about 60-70 minutes or until set but slightly jiggly in the center.
- Turn off the oven and crack open the door; let it cool inside for about an hour before removing.
Step 4: Prepare Toppings
- For chocolate ganache, heat heavy whipping cream until just simmering then pour over chocolate chips; stir until smooth.
- In another bowl, whip remaining heavy whipping cream with powdered sugar until stiff peaks form; fold in peanut butter and vanilla extract.
Step 5: Assemble Your Cheesecake
- Once cooled completely, spread ganache over top of cheesecake evenly.
- Pipe or spread whipped peanut butter cream on top as desired.
- Finish by sprinkling additional chopped Butterfingers on top for garnish.
Now you’re ready to serve your delicious Butterfinger Cheesecake! Enjoy every creamy bite!
How to Serve Butterfinger Cheesecake
Serving your Butterfinger Cheesecake can elevate the dessert experience. Here are some creative ways to present this delicious treat.
Classic Slice
- Serve a traditional slice of Butterfinger Cheesecake on a dessert plate, garnished with whipped cream and a sprinkle of chopped Butterfingers for added crunch.
Mini Cheesecake Cups
- Create individual servings by layering cheesecake in small cups. Top each cup with chocolate ganache and a piece of Butterfinger for an enticing presentation.
Cheesecake Parfaits
- Layer pieces of Butterfinger Cheesecake with whipped cream and crushed Oreos in a glass. This makes for an eye-catching dessert that’s perfect for gatherings.
With Fresh Fruit
- Serve slices alongside fresh berries or banana slices. The fruit adds a refreshing contrast to the rich flavors of the cheesecake.
Drizzled with Sauce
- Drizzle warm chocolate sauce or caramel over the cheesecake before serving. This adds an extra layer of sweetness that complements the peanut butter flavor beautifully.
How to Perfect Butterfinger Cheesecake
To ensure your Butterfinger Cheesecake turns out flawlessly, consider these helpful tips.
-
Use Room Temperature Ingredients – Allow cream cheese, eggs, and sour cream to reach room temperature before mixing. This helps create a smooth and creamy texture.
-
Don’t Overmix – Mix ingredients just until combined to prevent incorporating too much air. This keeps your cheesecake dense and rich.
-
Bake in a Water Bath – Use a water bath while baking to maintain moisture and help prevent cracks on the cheesecake surface.
-
Chill Thoroughly – After baking, let the cheesecake cool before refrigerating it for at least 4 hours (or overnight). This enhances the flavors and texture.
Best Side Dishes for Butterfinger Cheesecake
Pairing side dishes with your Butterfinger Cheesecake can enhance the overall dining experience. Here are some delightful suggestions.
-
Fresh Fruit Salad – A bright mix of seasonal fruits adds freshness and balances the richness of the cheesecake.
-
Chocolate Mousse – Light and airy chocolate mousse complements the dense cheesecake while providing an indulgent touch.
-
Vanilla Ice Cream – Creamy vanilla ice cream is a classic pairing that melts beautifully alongside warm slices of cheesecake.
-
Whipped Cream Topping – A dollop of homemade whipped cream offers lightness and enhances the dessert’s presentation.
-
Chocolate-Covered Strawberries – These sweet treats provide a fun, elegant touch that pairs well with the flavors of your cheesecake.
-
Caramel Sauce – Drizzling caramel sauce over each slice can add an extra layer of flavor that matches perfectly with peanut butter.
-
Nut Brittle – Crunchy nut brittle brings texture and contrasts nicely against the creaminess of the cheesecake.
-
Coffee or Tea – A warm cup of coffee or herbal tea rounds out dessert nicely, offering warmth and comfort after enjoying your rich treat.
Common Mistakes to Avoid
When making Butterfinger Cheesecake, it’s easy to overlook key details. Here are some common mistakes to watch for.
- Skipping the Room Temperature Ingredients: Using cold ingredients can lead to a lumpy cheesecake. Always let your cream cheese and eggs sit out for at least 30 minutes before mixing.
- Not Prepping the Pan: Failing to line or grease your pan can result in a cheesecake that sticks. Use parchment paper or cooking spray to ensure easy removal.
- Overmixing the Batter: Mixing too much can incorporate too much air, causing cracks. Mix just until combined for a smooth texture.
- Underbaking or Overbaking: Both can ruin the texture of your cheesecake. Keep an eye on baking time and check for a slightly jiggly center before removing it from the oven.
- Neglecting Chilling Time: Cutting into the cheesecake too soon can ruin its structure. Allow it to chill in the fridge for at least 4 hours for best results.
Storage & Reheating Instructions
Refrigerator Storage
- Store in an airtight container.
- It will keep fresh for up to 5 days in the refrigerator.
Freezing Butterfinger Cheesecake
- Wrap individual slices tightly in plastic wrap, then place them in a freezer-safe bag.
- Frozen cheesecake lasts up to 3 months.
Reheating Butterfinger Cheesecake
- Oven: Preheat to 350°F (175°C). Place slices on a baking sheet and warm for about 10-15 minutes.
- Microwave: Heat on low power in short intervals (10-15 seconds) until warm.
- Stovetop: Place slices in a skillet over low heat, covering with a lid until warmed through.
Frequently Asked Questions
Here are some frequently asked questions about Butterfinger Cheesecake that may help you during preparation.
What is Butterfinger Cheesecake?
Butterfinger Cheesecake is a rich dessert made with cream cheese, peanut butter, and chopped Butterfingers, all set on an Oreo crust.
How do I make Butterfinger Cheesecake?
To make Butterfinger Cheesecake, mix cream cheese, sugar, and peanut butter, fold in chopped Butterfingers, pour into an Oreo crust, and bake until set.
Can I customize my Butterfinger Cheesecake?
Absolutely! You can add different toppings like chocolate shavings or swap out Butterfingers for other candy bars if desired.
How long does it take to make Butterfinger Cheesecake?
The total time includes about 45 minutes of prep and baking time. Remember to chill it for at least 4 hours before serving.
Final Thoughts
This Butterfinger Cheesecake is not only delicious but also incredibly versatile. You can easily customize it with different toppings or flavors to suit your preferences. Give this delightful recipe a try; your friends and family will love it!
Butterfinger Cheesecake
Indulge in the delightful experience of Butterfinger Cheesecake, a creamy and rich dessert that fuses the irresistible flavors of peanut butter and Butterfingers into a smooth cheesecake filling. Nestled within a decadent chocolate Oreo crust and topped with luxurious chocolate ganache and fluffy whipped cream, this cheesecake is perfect for celebrations or as a special treat at home. Easy to make and visually stunning, it will impress your family and friends with its layers of flavor and texture.
- Prep Time: 45 minutes
- Cook Time: 70 minutes
- Total Time: 1 hour 55 minutes
- Yield: Approximately 12 servings 1x
- Category: Dessert
- Method: Baking
- Cuisine: American
Ingredients
- 2 1/4 cups Oreo crumbs
- 4 tbsp salted butter, melted
- 24 ounces cream cheese
- 1 cup sugar
- 3 tbsp all-purpose flour
- 3/4 cup sour cream
- 1/2 cup peanut butter
- 4 large eggs
- 1 1/2 cups chopped Butterfingers
- For toppings: semi-sweet chocolate chips, heavy whipping cream, powdered sugar
Instructions
- Preheat oven to 350°F (175°C) and combine Oreo crumbs with melted butter in a bowl. Press mixture into the bottom of a springform pan.
- In another bowl, beat cream cheese until smooth; gradually add sugar and flour. Mix in sour cream, peanut butter, and vanilla until smooth. Add eggs one at a time, then fold in chopped Butterfingers.
- Pour filling over crust and bake for 60-70 minutes until slightly jiggly in the center. Let cool before refrigerating for at least 4 hours.
- For toppings, heat heavy cream, pour over chocolate chips, stir until smooth; whip remaining heavy cream with powdered sugar to stiff peaks and fold in peanut butter.
- Once cooled, spread ganache over cheesecake, top with whipped cream, and garnish with more chopped Butterfingers.
Nutrition
- Serving Size: 1 slice (112g)
- Calories: 420
- Sugar: 28g
- Sodium: 340mg
- Fat: 30g
- Saturated Fat: 14g
- Unsaturated Fat: 14g
- Trans Fat: 0g
- Carbohydrates: 33g
- Fiber: 2g
- Protein: 7g
- Cholesterol: 100mg